
For Repairs and service of Large Format Printers and Plotters Call (786) 306-8825
Services
Our clients choose us because we’re industry experts. We are specialists in the repair and maintenance of out of warranty large format printers and plotters, and with our Asian suppliers we have at our disposition and availability most parts and accessories needed to fix any problem in a very short time.
Printer maintenance is critical to the life of your equipment, and last month we covered some basics about how to clean and adjust your printer. In this article, I want to discuss some more technical aspects of printer maintenance - specifically the dampers and Prinheads. Many printers use these for both water and solvent based printers, and, over time, these parts will fail. Many manufacturers consider these parts “consumables” like media or ink. You can expect (depending on use) to replace these parts every six to 12 months.
Print Heads Replacement 101
Dos & Don'ts

DONOT ATEMPT TO DO IT THIS WAY!
CALL US! (786)306-8825
Steps for Manually Cleaning the Printer Head
Step 1 - Remove the ink tanks and printer head. Remove the ink tanks from the printer head (tank holder) and seal them in a zip lock or other sealable plastic bag. Set them aside, preferably propped upright.
Next remove the printer head (it snaps out). NOTE: You may want to wear latex gloves to help keep ink off your hands.
Step 2 - Soak the printer head. There are multiple suggestions on ways to clean the printer head and all have some variation on the following:
DONOT ATEMPT TO DO IT YOUR SELF!
Caps and Sponges 101
Dos & Don'ts

Read the Manual—Following the prescribed maintenance schedule listed in the printer’s manual can head off disaster and keep your printer running smoothly longer.
Many printer manufacturers recommend replacing Caps and Sponges at certain intervals; and suggest replacing other components like caps, wipers motors and the like after recommended for replacement after so much use.
Print Heads Flexy Cables 101
Dos & Don'ts

Alternative Soak Method:
Mix a 50/50 solution of warm water and Windex and place in a shallow container, enough to cover the base of the printer head and ink ports. Leave for 2 hours while agitating the unit occasionally. Remove from the mix and lightly scrub the base and internal ink ports with an old soft toothbrush. Do not scrub the gold contacts but don't be concerned if they get wet. Return the unit to the mix for another 2 hours and agitate occasionally. Remove and scrub again as before.
Step 3 - Flush the printer head with water.
-
Hold the unit under a softly running warm water tap. Place your finger over the tap to create back pressure to allow you to squirt the water into all crevices of the printer head. You should see the gunk build up flow out. Do this until the water runs clear.
-
DONOT ATEMPT TO DO IT THIS WAY!
CALL US! (786)306-8825
Gaphtec Plotters are our specialty
We values our customers and provides support for Graphtec drivers, software, and hardware. We also try to assist with basic third party software support. However when the question goes beyond the basic level the best way to support you is to turn to the experts who use the third party software.
Dampers Replacemenst 101
Dos & Don'ts

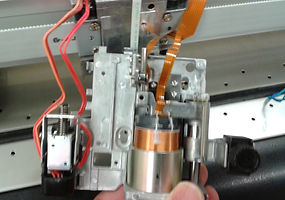
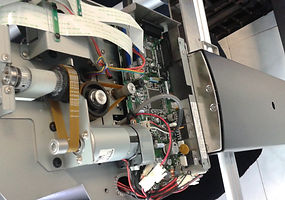
What is a Damper? - Dampers are small reservoirs that the ink tubes connect to, just above the print heads (Image 1). Each ink channel or tube will attach to these dampers, which then attach to the print head and feed it ink. Dampers serve several purposes. Inside each damper is a small filter designed to screen out any contaminates in the ink. Dampers also have a one-way valve for ink to move into them from the ink tubes but not allowing ink to flow into them from the print heads. These are designed so that ink flows one way through the dampers on their way to the print heads. The small reservoir on the damper is designed to create and maintain negative pressure (once primed by the pumps) so that ink continually draws into it. This helps keep ink flowing through the system as the heads move back and forth, thus reducing the number of times the heads must “dock” to refill with ink during a print.
Cutters and Plotters 101
Manually Adjusting the FC8000 ARMS Sensor Level for Glossy Media and Glossy Laminated Prints When using some glossy media or when using glossy laminated prints, sometimes the sensor may need to be adjusted. If the sensor is finding some of the registration marks and not others, the optimum setting has been determined to be X=70 and Y=80. By following the steps below the sensor values can be set.